Drip Torches, Deconstructed
This page/content is part of the Southeast Prescribed Fire Update Web Archive. It is kept only for reference, research, or record-keeping and is no longer maintained. It may not meet current accessibility standards. To request content in an accessible format, contact us via email.
Written By: Kayci Willis
The Drip Torch
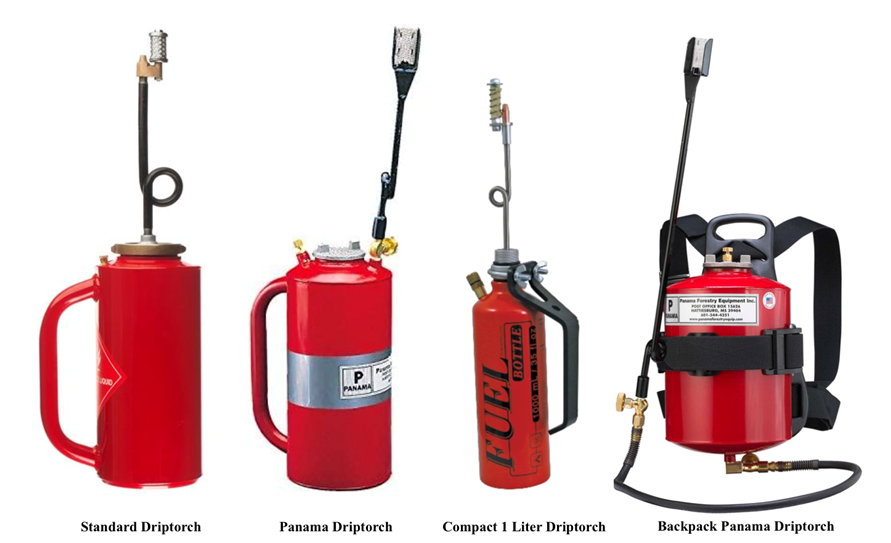
While there are a number of more technologically advanced ignition methods with drones, ATV attachments, and helicopters, the wildland fire industry’s tried and true method of ignition remains the handheld drip torch. A drip torch is a tool that can be used to purposefully ignite fires by dripping flaming fuel onto the ground. This article will go into detail on the pieces, function, and maintenance of a drip torch as well as providing resources for additional information. It is important to note that there are a few kinds of drip torches, each with unique differences (Figure 1). The following article focuses on the standard drip torch.
Pieces and Parts
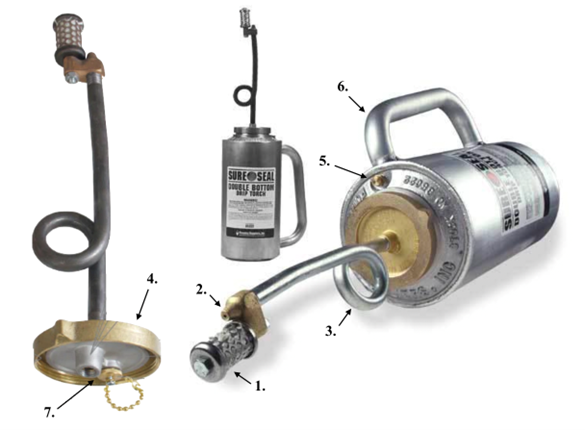
- Wick – Maintains a small ball of fire on the end of the drip torch for fuel to pass over and ignite from.
- Spout – Fuel exits the canister through this nozzle and pours onto the wick.
- Fuel Trap Loop – This loop prevents the fire from backing into the main canister. When a torch is assembled, this loop should always be facing the opposite direction of the handle.
- Locking Ring – Holds the torch assembly together, whether it is configured upright or inverted for storage.
- Air Breather Valve – Allows air to enter the canister while fuel is exiting and controls the flow of fuel.
- Handle – For holding the drip torch. It is not advised to hold the drip torch by any other part.
- Discharge Plug – This plug prevents the flow of fuel during transport and storage when screwed into the fuel outlet at the base of the fuel trap. If your torch is assembled and not pouring fuel, double check this plug has been moved over to the parked position.
Usage
A drip torch is just a vessel for fuel. It is recommended to fill a drip torch up about 75% of the way, to give room for gas expansion when temperatures increase. If filled to the top, the torch will leak as pressure builds up, wasting fuel and creating a safety concern. Fuel ratios are usually approximately 4 parts diesel, 1 part gas mix. Too much diesel and the torch will be difficult to light. Too much gas and the fuel will burn up before reaching the vegetation. The exact ratio will depend on weather and fuels, consult with a fire practitioner in your area to determine the appropriate mixture for your prescribed burning objectives.
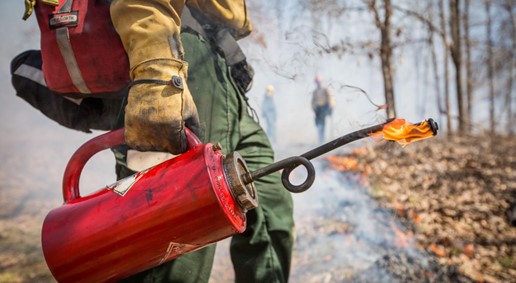
To ignite a drip torch, pour a *small* amount of fuel on some leaf litter/pine needles, make sure the fuel saturates the wick, and ignite the fuel on the ground with a lighter. Place the wick of the torch in the flames, careful to not let too much fuel pour out of the spout. You can also grab fire from a test fire or already-ignited vegetation. When the drip torch is not in use, whether ignitions are paused or you are taking a quick breather, the torch should be extinguished. It is not advised to blow a drip torch out as there is a high risk of your face getting burned. Instead, while wearing a thick leather glove, grab the wick in your hand and smother the small flame.
You can control the amount of fuel that is released from the drip torch by adjusting the Air Breather Valve (Figure 2, #5). When it is closed, the drip torch will not pour fuel. The more it is twisted open, the faster fuel will exit the spout. This valve control helps igniters use different techniques to meet different burning objectives. For a “low and slow” burn, the steady trickle of a partially opened air breather valve allows you to place dots of burning fuel on the ground. For a hotter burn, the stream of a fully open valve allows you to put more burning fuel down in one spot, or drag strips of fire across an area. It is important to note, when fully open, the stream of fuel can overshoot the wick and not ignite.
Demonstration
In the video below, Randy Russell, a wildland firefighter with the Texas Forest Service, describes the features and function of a drip torch. This video covers the ignition and extinguishing of the flame. The proper assembly, disassembly and storage of this essential piece of prescribed burning equipment are also demonstrated.
Maintenance
Before you can drag fire across your burn unit, your torch needs to be in operating condition. Gaskets wear frequently causing leakage and wicks can get clogged, so providing proper maintenance of your equipment will ensure safe, reliable use on the fireline. Drip torches are fairly affordable, but to get the full life out of your ignition tool, you should regularly clean and replace the pieces.
To clean a drip torch, first ensure there is no fuel remaining in the can. Then wash with mild degreaser soap and water. Remove any crust and deposits inside the tank. Flush out the air breather valve to remove any sediment. Use a wire brush to remove the carbon build up on the wick, checking the condition of the wick fibers. Dry the torch with a clean rag and air hose, ensuring no water is left in the torch, wick, and fuel trap loop. When cleaning, inspect the torch for any missing or damaged pieces. These pieces should be replaced before the torch is used again.
When replacing drip torch pieces, it is important to note that parts are not interchangeable between torches. There are different drip torch manufacturers, so it is best to purchase replacement parts from the manufacturer of the torch. Switching around pieces and buying mismatched replacement parts can cause fire and fuel hazards.

Storage
When finished with ignition, after the wick has cooled, disassemble the drip torch into its transport/storage configuration. For a regular drip torch, the post of the drip torch is inverted and placed inside the tank of the drip torch, the breather valve is closed, and the discharge plug is screwed into the transport position to prevent leakage. Some torches, like Panamas (Figure 2), do not disassemble for storage. For these drip torches, ensure all valves are closed and the lid is snug. When stored, keep in a cool shaded spot to reduce gas pressure build up and potential leakage. Do not place anything on top of drip torches and ensure the torch is labeled with a flammable liquid sticker or tag.
References and Resources
For more information on drip torches, maintenance, and troubleshooting visit: https://www.nwcg.gov/sites/default/files/publications/pms443.pdf
https://www.nwcg.gov/sites/default/files/training/docs/s-130-ig11.pdf